Finishing a fabric ATC

I thought I’d show you how I “finish” my embroidered Artist Trading Cards. I’ve noticed that in textile art the last touch to the work is very important. An ugly edge or badly made backing can really take away from the beauty of the embroidery or quilt, so it’s important to at least have some kind of idea about what to do with it.
I am by no means an expert, but this backing method works fine with small ATC:s.
I trace the size of the ATC onto the fabric before I start my embroidery, using a pencil. It gives me the correct space to work on from the beginning, so that I know how close to the edges I can sew without having to cut away anything form the design later on.
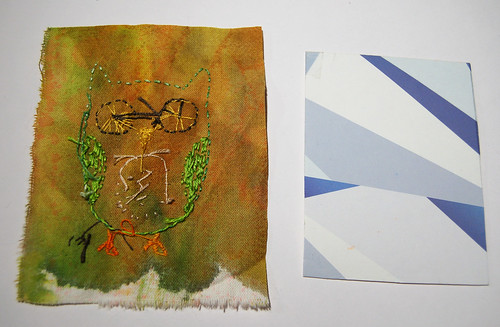
So I start with a cutting out a backside in paper that then acts as a drawing template. I recycle the cardboard from cereal boxes, beer packing and other containers that are sturdy but not very thick. This cardboard piece is from a gift box.
The size is important, an ATC has an exact size and it is what defines it as such, so try to cut as exact as possible! It should measure 64 mm x 89 mm (2.5 x 3.5 inches) when finished. I think this is important especially when you’re trading. It’s kind of strange to receive an ATC that is slightly larger or smaller, because then it might not fit into the album you’re collecting them in for example. Just saying.
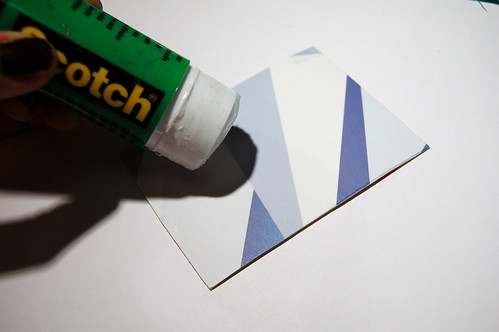
I use a regular paper crafty glue stick for almost all my gluing, including this project. I love my glue stick! Cover the whole cardboard with glue and then carefully lay your fabric down to make it fit. You can lift it, or pull at the edge here and there to make the drawn lines on the fabric snuggle up with the edge of the card. I’ve also done this with an extra layer of soft fabric backing, like a thin quilt backing, and that works too (and makes it more textile, and thicker and softer of course).
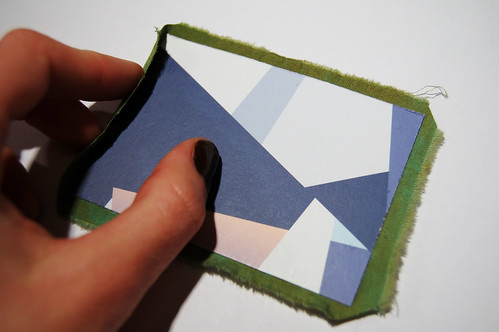
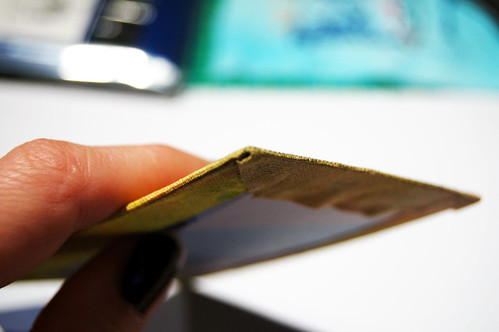
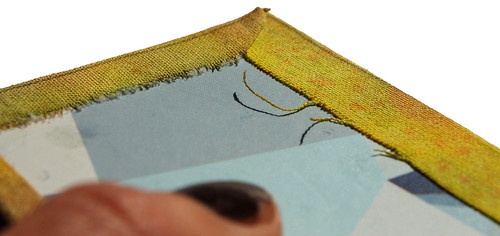
Then you cut away the excess fabric and each of the fabric corners, so that the corners doesn’t become to bulky once you fold the edge over. I put glue on the fabric edges and fold them down, poking the edge of each corner in place with my finger nail.
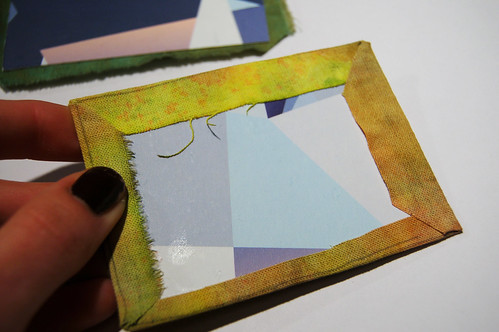
Fold one edge at the time and turn the ATC over to see how it look from the front. If it doesn’t line up you can still pull it up and redo it.
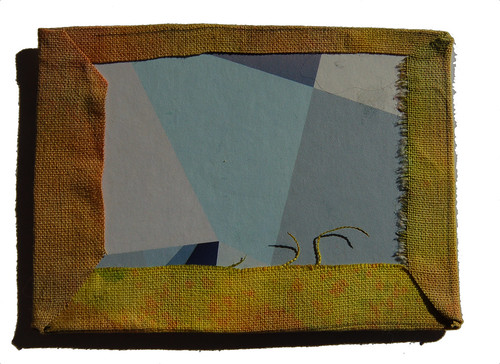
When all edges are folded I put mine flat under a pile of books to let it dry.
I always glue another thin paper to the back, with a printed label that has all my details. It should state the title of your work, in this case it says Guggla nr 5. You should also always add the date, your full name and signature, and some contact information like your email address and maybe the name of the one you’re giving it to, especially if you’re making it while thinking of that person. It’s kind of sweet.
I’ve designed special ATC backsides for myself, and one for mom in Indesign, that I print and glue to each back. I don’t have a photo of them right now, but I might write further about them another time.
There are nice stamps designed for ATC backside information and free templates online to print and use (examples here, here and here). Maybe you wanna pack it up in a cute ATC envelope before sending it of? Of course this tutorial can be used with fabric collages, drawings on fabric etc, and not just embroidered ones. You can view the whole flock of embroidered owls with backsides done this way in previous posts.
I hope this tutorial was helpful!
Related Posts

18 Responses
-
Pingback: Fyra kort blev det « designmadde
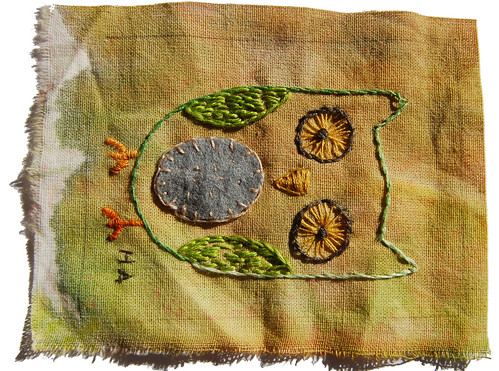
Oh, how I love that owl! When I was a child, I had an owl done in crewel hanging over my bed … I remember my mother working on it for days!
This is a great technique for glueing down the fabric – so neat and tidy!
and I am loving your pimped out Moleskines :)
xo Lis
Interesting to see the whole process; thank you.
Thanks for this tutorial – it’s good to see close ups of the process! I think this would work well for fabric postcards too, and save the chore of satin stitching round the edges.
Viv, absolutely! This way would work well on a fabric postcard project I’m sure, though I think the stitching around the edge also adds its charm. :-)
These are so pretty, Hanna ! Love these stitched up, special ATC s fill with Hanna magic.
You are filling your summer days with such good arty play. Inspiring as always !
Enjoy, Lovely One !
Thanks for showing how you make your embroidery into ATCs. I think you are right that those final details can make or break a project. It’s so simple when you show how you do it, but I have a feeling that if I had been left up to my own devices, mine would have turned into a wadded up mess! So thank you for preventing that!
That owl is SO cute!! :-)
I love your embroidered owls!!! What a fabulous blog you have!!! Thanks for your comment on my olive grove from Tuscany….yes, it is a lovely place for a painting trip but it is sooooo hot and buggy:)……..ahhh what fond memories of being attacked by the biting flies………what joy to be in nature……………although the owner said that tree was planted by his g,g,g,g,great grandfather,,,I was in awe of it….and it was actually much larger than I depicted it as my canvas is only 20x20cm…so I had to “downsize” the beauty. But I love going to Tuscany…..I always feel like I am in a dream world…that is until the bugs start biting,,,then I wake up…………….have a wonderful evening.
WOW!
These are beautiful :]
As always, thank you for sharing your many talents.
The colours are gorgeous! You definitely inspire me to ‘do something fun’ with fabric soon!
these are so adorable. thanks for sharing!
Great idea. the only worrisome thing is that you should mount your art on acid free cardboard…not recycled cardboard. The acidity in the board will migrate into the fabric and threads over time.. the same goes for the glues used…don’t use anything but acid free glue sticks.
I have watched my early craft works (from the 60s and 70s turn ugly golden brown due to acidic glues and plain old cardboards…and wound up taking some museum conservation classes to learn more about how to create art that will last.
Hope this helps! Your ATCs are wonderful!
Thank you Mary Anne, for chiming in and talking about archival issues. I’m not that concerned about here it though, these are tiny works for trade. And since I mostly make collages and all the papers I use are non-archival I don’t think about their longevity… They will last as long as they last. But for bigger works, or when selling, this is important indeed!
I love your owl cards! I trade atcs and was wondering if you would be interested in trading with me sometime! I create in many mediums and styles. Please take a look. you can also see some of my atcs here!
Thanks!
Kathy
Kathy, my owl ATC’s are all spoken for, sorry, and right now I don’t have the time to trade. Please remind me again in the autumn and I’m sure we can figure something out. Yours are so pretty, though my favorites were among the already traded, hehe. :-)
Take care!
I love owl, and your owls are real cute!
I agree with Mary Anne about the acid-free stuff. It’s a pity if hours of work are put into the stitching, and they discoloured. If unlucky, they will turn colour within a short time and cause heartache. I believe a true fabric ATC has material like Timtex or similar for the centre. Perhaps you can try stiffened felt?
So cute! I kind of backed off ATCs when I started getting into sewing. I never thought of doing embroidered ones. Do you know of any ATC swaps that are embroidery or fabric based?