Tutorial on how to make decoupage magnets (pdf)
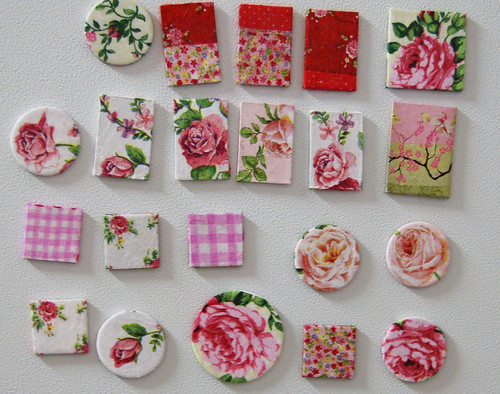
Here is an image of my finished magnets in shabby chic style!
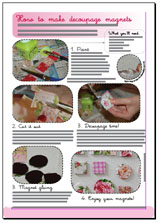
At my journalistic education we worked with Macs and did magazine layout in Quark Express. I’ve installed Adobe’s layout program InDesign because I want to know it too. While trying it out I did a tutorial on how to create decoupaged chipboard magnets! I saved it in PDF-format so that you all can have a look!
It’s free for you to download and print. I hope you like it. I had fun making it, but I wish my designing skills were better. But if anyone enjoys this I might do more tutorials in the future and maybe improve my layout skills a bit.
If you want to bookmark the tutorial please link to this post, thank you!
Free PDF: download the tutorial!

That tutorial is so well designed and pretty — it’s a work of art in itself, Hanna.
The process is very similar to the one I use for my map magnets, except I use wood pieces instead of chipboard, and the watercolor paper prints that didn’t work as prints. They’re time-consuming, but people seem to love them and they made GREAT Christmas presents this year.
You can also take one image and cut it out across multiple pieces of wood/chipboard, so that it makes a magnet set, almost a puzzle.
These are so pretty! I’ve been wanting to do a project with decoupage, but I’m not quite ambitious enough to do a piece of furniture. I think I’m going to send this tutorial to my 12 year old neice also, I think she’d like it. Thanks!!!
Thank you so much for the tutorial. I can’t wait to try it. All the things you make inspire me. Your such a sweetie for doing this.
Du ?r s? himla duktig!
S? galet avis p? dig och allt ditt pyssel. En dag ska jag bli som du!
Ses i p?sk! Kram
Excellent PDF Hanna…with all the lovely napkins around, theres a motif for everyone!
Snyggt jobb med tutorialen! Snyggt, enkelt och l?ttl?st!
I can’t STAND it! This is TOO GOOD!!
Thank you!
Great job with your tutorial and lovely magnets!
thank you! love this! :)
Very nice. I’ll do these with a baby theme to go into the party favors for a baby shower next month. Thanks for the great idea!
wow! love this! will definitely try this one thanks! :)
they looks amazing and so easy to do! thank’s for tutorial :)
Hello, long-time-no-write. Just tweeted about your tutorial as part of my daily how-to:
twitter.com/groundsel
Thanks so much for putting this together.
I just read your “100 Ideas to Spark you into Creative Action” post and was totally intrigued with your ideas.
I started to make those magnets and posted them on Cut Out + Keep
http://www.cutoutandkeep.net/projects/diy_magnets
I hope you don’t mind, that I linked your How-To, it’s really great!
Thanks for all the Inspiration
Thanks for letting me know this tutorial was useful.
Julia, your magnets looks very cool and cute – well done! :-)
Thanks ;-)
This tutorial is fantastic! I have just made similar magnet :):):)