How to make a Photo Book for Week in the Life
I did Week in the Life last year for the first time, and each day a new folder on my computer filled up with a lot of new photos from that day. Once I start I don’t want to stop snapping!
I love the process of documenting my life, but also love using those photos in some way. Editing some, putting them together, combining photos, words and for this project, also my daily journaling. Creating layouts.
 By picking a special week to photograph it becomes a time limited project. As such I wanted to create something tangible, to finish it and hold the result in my hand. Something that was a real document of my week. I don’t scrapbook (I cringe at having to print all the photos and putting them in plastic pockets) so I quickly decided to make my week into a printed photo book, the third one I’ve made through Blurb. I made previous books using InDesign and creating my own layout, but this time wanted to finish quickly – and try something new.
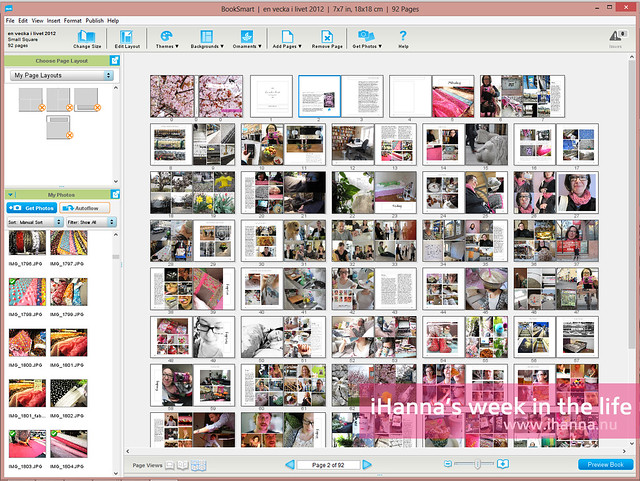
I decided to to with Blurb’s own layout program called Book Smart – a free download available both for Mac and PC!
BookSmart is easy and intuitive to use for me, and I think even design newbies could figure it out and make something nice with it. You can now also edit the provided layouts; you can add text on top of an image where there wasn’t a text box to start with, if you know what I mean… I like the possibility to alter the ready-made layout!
Anyway, I thought I’d write (a little) about my process of making last year’s Week in the Life photo book, to inspire you to make one too perhaps, or join next year.
1. Deleting Photos
I download all photos automatically into folders named by date. Then I go into each one and delete a lot of photos! This is the first step in my process. Deleting five of six photos taken at the same time, deleting blurry photos I don’t need or don’t like (I might keep a few blurry ones though, sometimes they tell their own story). I need to delete a lot because I snap a lot, often and sometimes too much. Nobody will ever want to see all my self-portraits anyway, except me, and even then I want to keep the copy that I like the most.
Looking through your photographs and deleting what you won’t need is important with all digital photography! Though I could become better at this practice…
I don’t remember how many photos I actually took the first Monday last year, but in the folder, after deleting, there are over 90 pictures left! Of those I have included 63 (!) in the book, flowing over 17 pages. I’ll get back to how I did this in a while.
** Suggested reading: What to do with all these digital photos….
2. Importing into BookSmart
Open BookSmart and chose a format and a title for your book (you can change it later). I picked the square format, which is a small book size of only 7×7″ (18×18 cm) but a format I love. Once you have imported the photos you want to use you can either let them “flow into” the layout chronologically, or pick and chose what photo goes into what page and where. I take the later rout, to have more control. I like telling a story with several photos on one page.

3. Combining photos + words
I find that it is best practice to first finish editing the photos and writing out your journaling, before starting to create the book. In this way you already have an idea of what you want, and preferably in the order you want it in your book. Now it’s time to drag and drop the imported photos into the layout, pasting or importing the text blocks and deciding what looks good to you and what you like. It’s all up to you in what order you want it all, what to exclude, how many pages to add and what to highlight. Pretty photos in good light get to fill a whole spread. Photos that goes together are squeezed into one page – in my book. Once you finish all the pages it’s easy to upload your book directly to the Blurb server and order your copy!
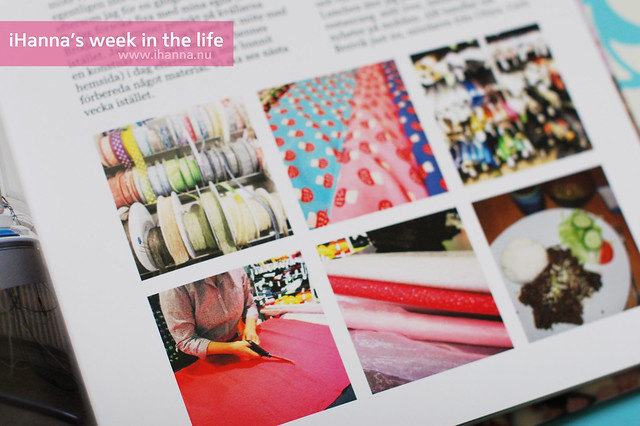
Monday lunch I did what Julia Cameron calls an artist date. I did some lovely fabric store browsing, just looked at the yummy materials, enjoyed the beautiful patterns and colours – and snapped photos.

So my Monday starts with half a page filled with one of those fabric photos as a title page with the text Monday (måndag in Swedish) printed in large letters above the photo. Another page shows a combination of photo from the shop (where I bought some fabric) and my lunch out, a combination that tells the story of that hour, together with what I wrote about.
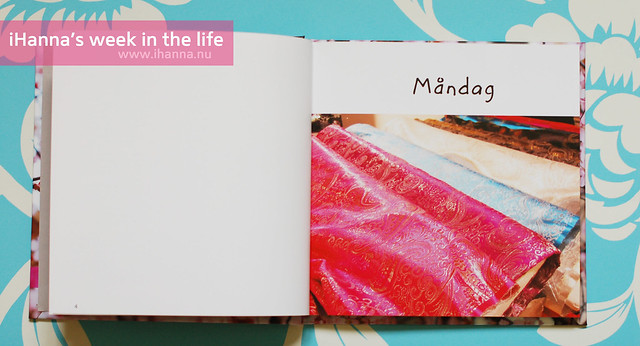
“The fabric page” (below) tells the story of “lunch hour”, but also how much I love and are inspired by materials. I often visit some of the artist shops in Stockholm on my way home. Another page tells the story of my “ten minute walk” from the train station to my apartment, what I saw (trees, spring flowers, and a cat), but not all hours are equally and as thoroughly documented (thank heaven!) or this book would’ve grown a lot more.
Still it is 92 pages (!) about only a 7 day period, and to you that might be too much. I don’t mind that my photo book grew thicker than I had imagined beforehand. I quite like it. I enjoy the photos inside and the time I spent editing them, adding words and combining it all. Yes, I love book making!
I’m happy with the format I picked for my book, and I love Blurb’s book quality. I’m not sure I will do the exact same thing for my Week in the Life 2013 photo book because I haven’t had time to start yet, but I’m looking forward to the book process.
The details
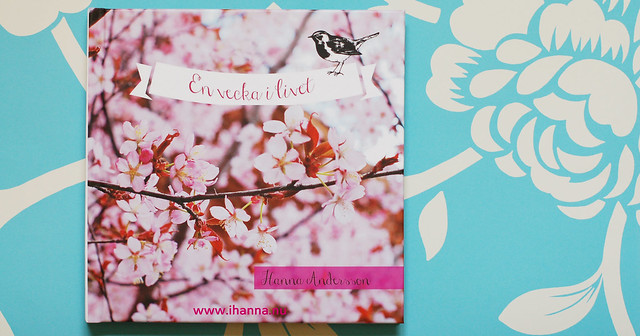
For my book I picked a hardcover with Image Wrap, which means that the cover image is glued onto the cardboard. The format is called Small Square, 7×7 inches (18×18 cm), and I managed to fill a whopping 92 pages! It has Standard Mid-Grey End Sheets, and the pages are Premium Paper (kind of plastic feeling) with lustre finish. It costs $46.52 to have this book printed, but with a 20 % off (-$9) and Swedish tax (about $4) and postage ($8.50) added I finally payed US $54.76 (345 SEK).
My previous book projects are A Year of Photos 2008 and the diptych book Because two is better than one if you want to check them out, the last one is available for purchase in my Blurb Store!
Let me know if this was helpful, and if you have any further questions! I’ll post more pages from this book – stay tuned.

Very helpful!
I made a blurb book last year (same format of yours, I love squared books!) but I had some problems using BookSmart. Don’t ask me why, it was confusing me, so gave up and I went on my way.
But I want to try again with a book about 2013, probably this post will help me! Thank you!
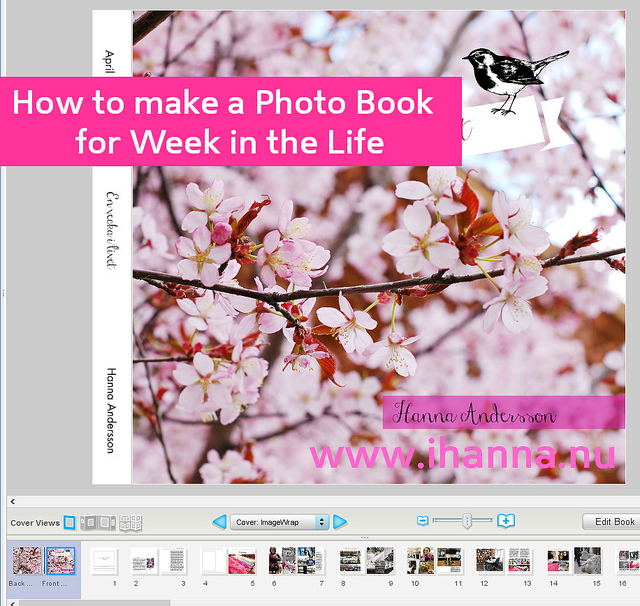
uh, the cover (last photo) is so lovely!!! Love the flowers and that little bird!!!
So glad you thought it helpful Silvia! I forgot to write about the cover, but I really like it too. Let me know if you’ve got any questions when you start making your next book. Oh, and the banner and bird I used as a cover title is found at Picmonkey and added to my photo of the cherry tree. :-)
Thank you Hanna!
Thank you for sharing this Hanna! I’m not sure what I will do with my witl photos, but I know I also want something tangible to come from it.
Cool! And very nice description.
Wow! This came out so beautiful!! Thanks for sharing the process, Hanna! I absolutely LOVE the fabric page! The photos are fantastic!!
I love this book, love that you made it so big and filled it with lots of yummy colors and stories!! Thanks so much for sharing this! Looking forward to seeing what you do with this years.
Mine still in process and wishing it was a bit bigger.
This is such a great post – I love how your book turned out :)
…same here BTW – I have to get better at deleting pictures!!! (still so many to decide on from our last trips…)
Cheers!
Gillar :-) Vill också prova någon gång!!!