How to Make Paper Cloth – a Tutorial
“Paper cloth” is a very unscientific term for combining scraps of papers on fabric. It creates a sturdy new material that you can sew, cut, collage and play with. I’ve seen it here and there, but thought you needed a little tutorial to get you stated. You glue small pieces of paper onto a larger sheet of fabric and then cover it with a silk paper! My papers are mostly recycled from gift wrappings. I will describe how I did mine, there are lots of ways you can do yours different. No rules, just glue glue glue!
")
Let’s go through how to do it and then start playing!
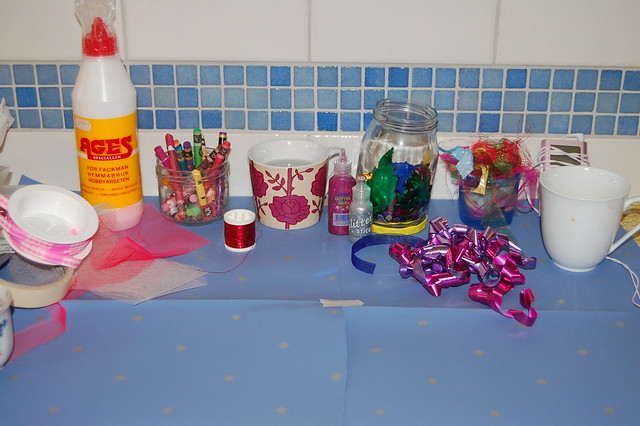
Stuff you’ll need when making Paper Cloth
- Muslin or cotton fabric.
- Scraps of thin papers like wrapping paper, silk-, tissue-, napkin- mulberry-, Japanese paper, text pages etc.
- Big sheets of (white) tissue paper.
- White glue, a mixing cup and a brush.
- A plastic surface to protect your table. I used a plastic table cloth, you can cover your table with baking parchment too. Everything will get gluey and messy, but it’s fun so set it up and start experimenting!
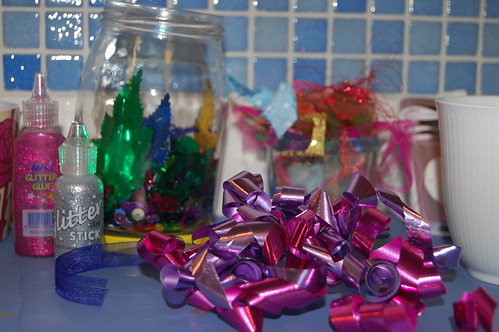
- Extras: glitter, stamps, ephemera, shimmer paint, sequins, acrylic paint, leftover threads, stickers, pieces of fabric, yarn etc.
Paper Cloth Tutorial
1. Cut a piece of fabric and lay it out flat on your working surface.
2. Mix the glue with water. You can probably use any white glue (Elmer’s, Craft glue, modpodge etc). I used a white all-craft glue, it says you can use it for wood, fabric and papers. Mix 1 part water to 1 part glue, or 2 parts glue to 1 part water, you will have to experiment to get the result you want. I mixed 1 to 1 and the fabric came out quite stiff after it had dried. Maybe if you dilute your glue a bit more it will be less stiff.
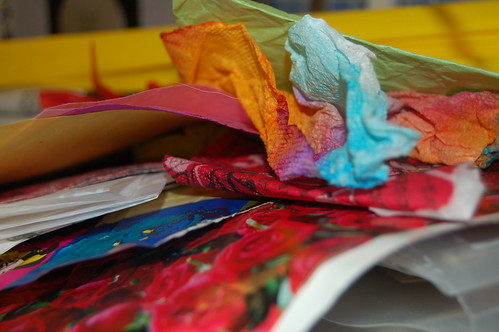
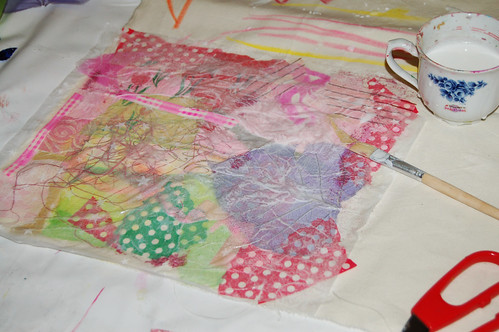
3. Gather all the paper scraps and materials you want to add to your surface before you start gluing. Tear them into small pieces, wrinkle them if they feel to stiff and make a pile of yummy colors.
4. Paint the glue+water mix onto the paper and press down paper scraps like you’re making a background collage. I mostly added pieces next to each other but also layered a few colored silk papers on top of each other to create layers and depth. The glue will seep through the fabric, that’s good I think.

5. When you’ve covered the whole surface add another layer of glue on top of everything and press down a sheet of white tissue paper (one that is just a bit larger than the fabric piece) on top of your collage. I use recycled white gift papers that I?ve collected after Christmas. They are already crinkly from the wrapping, but you can smooth it out as you press it down into the glue. Tissue (or silk) paper becomes very fragile when it touch the glue and becomes wet, so be careful not to rip it.
6. Paint a thin layer of the glue mix on top of the tissue paper and you’re finished!
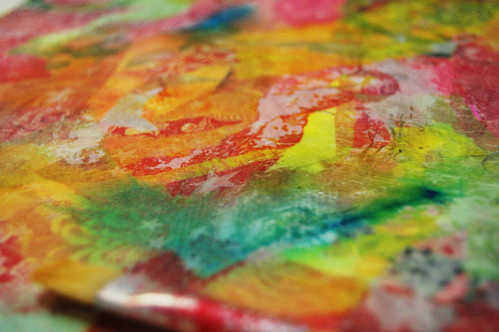
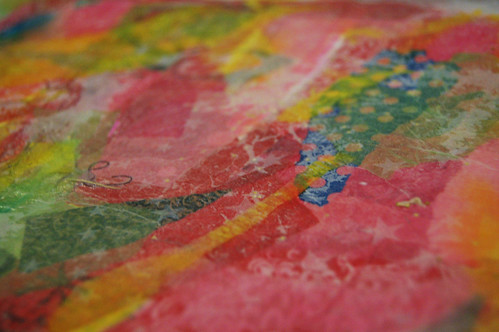
If you want to you can further decorate your paper cloth with acrylic paint, glitter glue or more layers, but this is optional. I did not paint my cloth paper because I was oh so curious on how it would look when it dried. It was a fun surprise to see how transparent the white silk paper because when wet. And when it had dried for 24 hours it still look colorful and cool. I’m happy with the result.

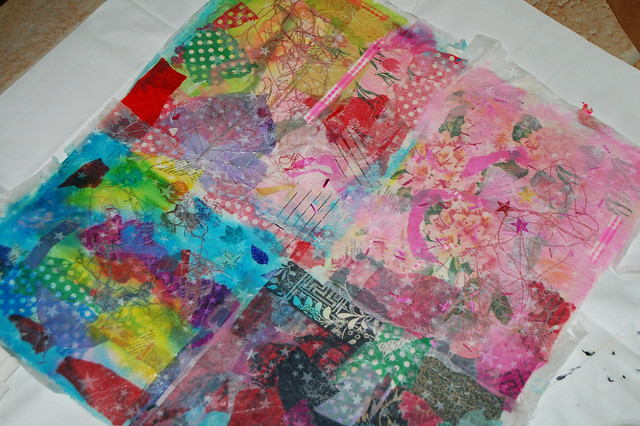
One of my first pieces of “paper cloth” is finished! I did mine in quarters as you can see, so the glue would not dry before I added the last layer. I will cut it up later and do “various projects” with it… I don’t have a plan, just a few ideas.
For options on what to do with your paper cloth check out Kristin Roach’s cool e-book Paper. Card. Ribbon. that I recently reviewed here. In it you’ll find patterns for cool sewing projects designed for cloth paper. I made postcards (!) from some of my paper cloth – I’ll show them in my next post.

This is the paper cloth looked like when it was dry:
You can keep adding layers to your paper cloth when the glue is dry. Paint acrylic washes, inks, doodle with markers or crayons or add glitter glue here and there. Machine embroider it. Cut it up. Make flowers, or hearts. Or book covers or postcards or… Keep experimenting. Enjoy.
Let me know what you make!

Your paper cloth is even more gorgeous in person!! I love the way the threads and sequins are sandwiched and peeking through the layers… thank you so much for the beautiful postcard that came today. I have loved your swap and have been such a lucky recipient of beautiful artwork. You’ve got some serious arty connections girl! xxx tj in germany
TJ, thanks for your comment! You must try to make some “paper cloth” yourself, it was such fun to finally get to use all those thin papers I’ve been saving on. Glad you liked the postcard too! Yay!
Your paper cloth looks sensational. Thanks so much for sharing it with us
Alison
HANNA!!!
I’m reading this at work and I can’t WAIT to try it. Do you KNOW how many paper and tissue scraps I have?!? Do you KNOW how much I want to make it my OWN? I am going to dive into this when I get home. If I don’t show you the results in a week or so, it means I glued myself to the table and I can’t get to the computer!
oooh such yummy papers!!
I think I can even spot the postcard you sent me in that papercloth you made. Am I right?
Lucky me to get a piece of this !! :D Thanks!!
I feel like spending the night making a papercloth myself. If not tonight, I will certainly do it later…or sooner :P
Thanks for sharing so many great ideas, Hanna!!
ps:
Need a new journal?
I’ve sewn a “junk journal kind of book”. I made it after reading your “sewing on paper”-blogpost (you are so inspiring!!)
Check out my blog and join the draw if you like the journal :)
hugs, ?shild
Wow, this is SO pretty! I love it! Thanks so much for the how-to, I’ll be linking.
wow, i’m adding this to my list of “things i want to make”! gorgeous colors – i wonder if it’s too stiff to embroider by hand?
I love this idea! Thank you for sharing, must try it over the weekend :)
Hi Hanna! I haven’t read your blog in years–but I’m so glad I’ve found you again! This paper is lovely… I am so inspired by all your creative energy bursting from the seams here.
Thank you for this awesome tutorial/idea. I’m looking forward to trying it myself!
Wow love this idea it is going on my loooong crafty to do list, but some day I will get it all done and then i will be soo happy.just a question:How did you come up with this idea?I always think this is an intresting thing to now. Its like being able to read someone crafty mind . Call me weird but I’d like to know.PEACE!
Ps. thanks for commenting on my blog:)
I surely will try this as soon as I can. I love all the mixed colors and materials.
Joana
I will try it too
This has been on my to-do list for a while. A friend just made some, if you look at my blog it is the Book RR with the tags…..she made it with her paper fabric. It’s awesome!
This is such a friendly, well-written, well-illustrated tutorial. Like everyone else, I can hardly wait to start making messes!
I love this, Hanna, thanks so much for putting together the tutorial!
This is SUCH a great idea. i cant wait to try it out!
Thank you very much for such a great tutorial! I was just going to ask how, you think, such paper cloth could be applied but then I found your next article on cards from papercloth. Great idea! Thank you!
This is friggin’ amazing! Totally using it with my art students! Thank you! xoxoxo
I just LOVE this and can’t wait to try it out! thanks for the demo!
Come by my blog , I’m having a charm swap that might interest you!
I can;t wait to try this with my kids. Thanks!
oooh this looks lovely and so much fun!
I found you via crafty crow and must pass this link along on my blog too in the next day or two!
Thanks so much for sharing!
COOL.NESS.
thank you for the idea!
melinda
Great tutorial! I made some postcards too! Here they are!
http://punkprojects.blogspot.com/2010/02/postcards-aceos.html
thanks!
I love this! So beautiful and simple. I featured this tutorial and linked to this post in my Friday Favorites! ~Lanie J.
Another person who makes fabric paper, KOOL!
I go back and forth between muslin and newspaper. Happy happies.
I just had to try this out :) It’s great, thank you for this tutorial.
You can see my results here http://sonja68.blogspot.com/2010/03/vikend-to-do-jev.html
I’ll be glad if you would’ve visited me.
This paper is beautiful. Thanks for a wonderful way to use some of my beautiful papers and scraps. Btw, your blog is amazing, so much rich information. Thanks again.
Thank you so much for this tutorial. I have a space on my wall that I just want to add color to. I think this is the answer! Your blog is so inspiring. Thanks :) I’ll be linking on Facebook.
Thank you sooo much for your wonderful ideas & tutorials. You are my daily inspiration for color & projects. Just finished my first paper cloth and hope to make a wallet and maybe a table runner. Did have trouble applying glue to the paper before I placed my final piece of tissue. So I just kind of dabbed it on. Again, thank you for sharing & your wonderful sense of adventure!
This looks like so much fun! I can’t wait to try it!!!!!
Now, this is really cool! I want to try this!
I love it! The colors make me drool and the tutorial makes me want to go give it a try. I will let you know how it turns out!
In the meantime, keeping making your beautiful art!
I’m an art quilter and have been trying to figure out how to use paper on fabric and them free motion quilt it, so I think I’ll try this. From all my research on making paper fabric, if you use 1 part glue to 4 parts water, it is much less stiff, which is the result I want. But we’ll see. I’ll let you know when I try it. Thanks for the information. Carla
Hi there! Great great ideas here, and thank you so much. I am hoping to make some of these and then print my artwork on them. Do they take well to computer/printer ink? Have you ever experimented with any of that?
Thanks :)
Rebecca
Glad you like the idea Rebecca, but to print on such an uneven and glossy surface would not be too smart I think. I doubt it would look any good… But try it, it might work if you do it a bit differently than I did here… :-)
Hello, this looks very interesting. I’m trying to set up a project for my clients to do to express their creative process as a group for Sexual Assault awareness month called the Clothes Line Project. Would I be able to do this on a large bed sheet and glue collage process (fabric paper) directly to the sheet? And could I also use paint and other mixed media: lace, other material..paper..glitter etc)? I do not want to sew or stitch any of the process to the sheet..just glue. Thanks ..this process looks like fun.
Hi there Janet,
you could absolutely do this in a larger scale, and as it says in the tutorial: adding paint, glitter etc is possible and a great idea! But just remember, the thinner the material the easier it is to get it to stick down. Tissue paper is ideal.
I hope your group enjoys this activity, let me know how it goes!
How do you soften the cloth up to use it in sewing garments?
I don’t think it’s supposed to be used as a fabric for clothes, but as a stiffened cloth for mixed media. I doubt any clothes made in this way would drape well, or function as clothing if it wasn’t for an art project. :-)
Beautiful! We can do so much with this tutorial. Thank you for passing the knowledge.
Thanks Maribell, glad you enjoyed this tutorial.
Hi there! Thanks for the post :) I�m interested in making prayer flags that have meaningful pictures on them for my family. Do you think this could be done with a single printed paper and maybe weatherproofed with some outdoor clear coat or scotch guard type product?
If I were to make prayer flags for outdoor hanging year round, I would use cloth, and do embroidery or image transfer on them. Fabric will hold up the best, and looks lovely waving in the wind. For paper, it’s always difficult even if you would try to cover it in plastic, but you could try of course, it’s up to you.
Good luck with your project. :)
I love this! Your paper cloth is gorgeous and so colorful and has inspired me to try it!
Thank you so much for showing us this technique. I wish I could post a photo of what I made, but don�t know how.
What different paper and fabric can you use? my daughter is doing this at school and has to look up what paper and fabric she could use and we can’t find anything on the internet to help her.
Yours looks lovely.
Thank you