When we brought Smilla the cat home the first time I realized that we didn’t have a bed for her. We got the climbing pole, the cage, the food, the toilet, the sand, a comb, the grass and a bowl to grow it in, toys, the cat and even cat candy… But no basket! It was just to expensive to buy, over 400 SEK at the pet shop. I put together a little bed for her out of a paper box. I put the paper box under our bed so that she could find a quiet and peaceful place to rest when everything was new and lots of people came around for my birthday. She liked to sleep there, in the beginning.
Now she feels safe and sleeps anywhere, in my lap right now. But still, every cat needs a cat bed, right? After visiting my friend Christina I saw how her mother had crafted a really nice cat basket or bed for their cats. I decided to do the same! And to craft a little tutorial for those of you who wants to do the same for the cat(s) in your life…
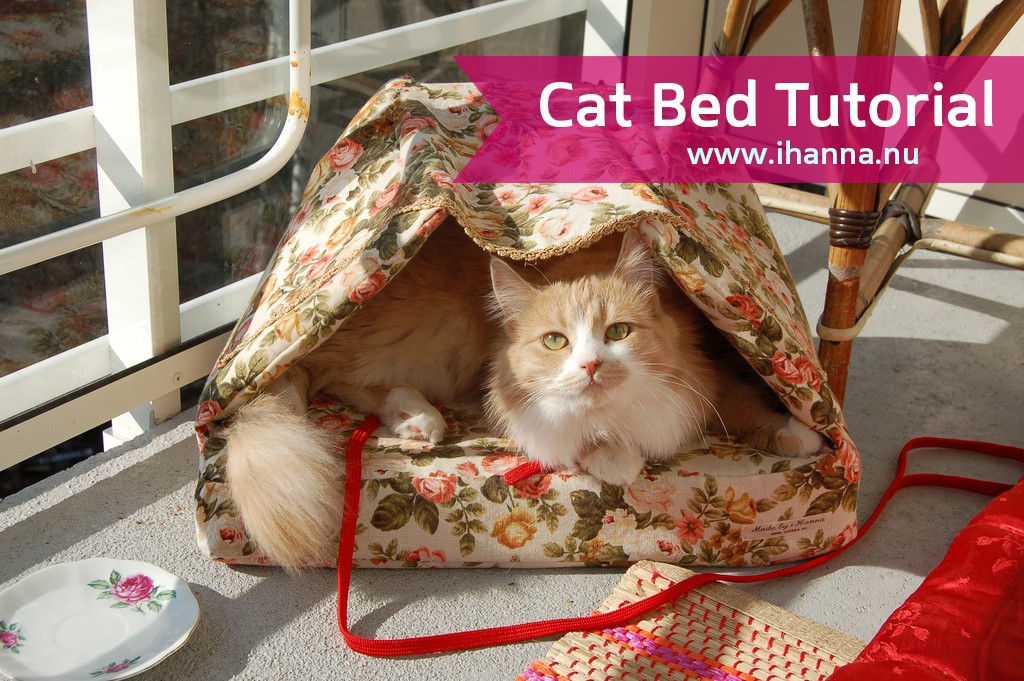
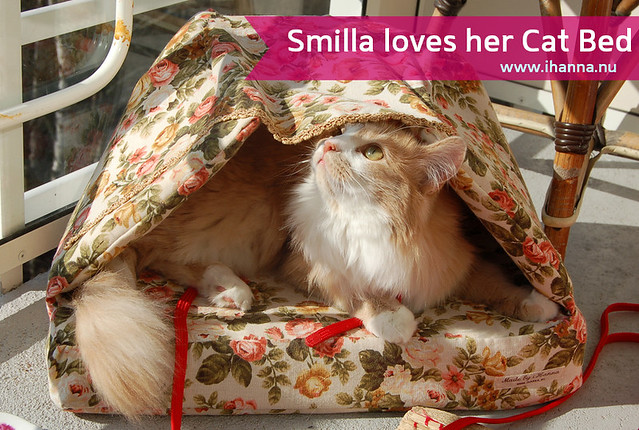
Smilla loves her basket! And I love how it looks with her inside! I’ve tried to make a tutorial, I know lots of you have cats.
Tutorial on how to sew a cat basket
I used a thrifted curtain in thick rosy fabric and exclusively for this purpose bought foam-rubber. One package was about 100 SEK and I used almost all of that. So total cost about 100 SEK really, the curtain fabric was just laying around doing no good.
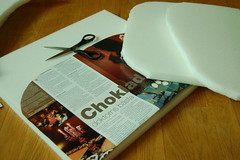 1. Make a pattern and decide how big the floor of the basket should be. I used a round plastic container to make this pattern out of magazine paper.
Then cut out the foam-rubber. I cut three of these to make a really thick and cozy bed bottom.
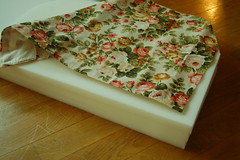 2. Cut out two pieces of fabric and measure how thick and long the edge piece should be and cut that out too.
 3. Use your sewing machine (or do it by hand if you prefer) and sew the edge of the fabric to one of the floor fabric pieces.
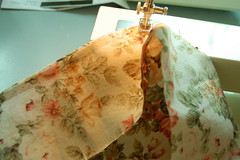
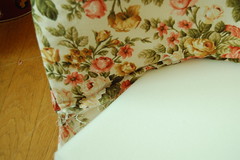 4. Now it is time to make the wall of the basket, and it should cover the rounding of the floor and be high enough for the cat to easily get into and out of the basket and short enough so that it is warm and cozy in there.
I measured the rounding of the floor and then cut what was left of the foam rubber. I sewed together two pieces of fabric and put the foam rubber piece inside of them so and then sewed all of it on place like you see in the picture:
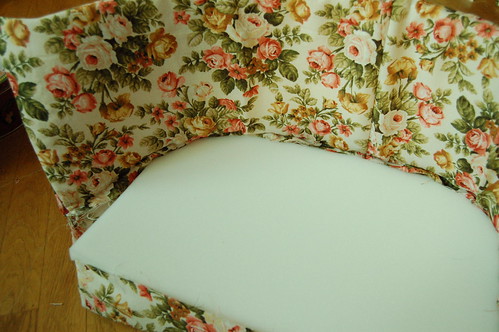
 5. Now it is time to add the floor fabric piece. Pin it in place all the way around, close to the wall and front of the cat basket.
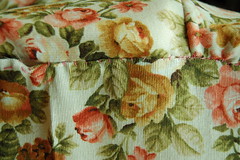 6. I hand stitched (with pink thread) all the way around to fasten it in place, to make the bed surface as smooth as possible. Took a bit of time, but was well worth it.
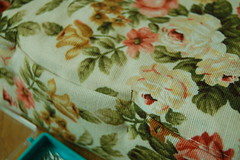
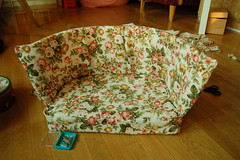 It’s starting to look like a sofa, right?
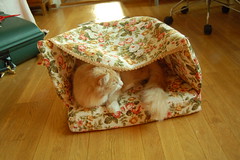 7. When it was time to add the ceiling, a funny thing happened. As soon as I placed the edge of the roof on the cat basket Smilla jumped down from her rest, came to me on the floor – and went straight into her basket. Guess if that put a huge smile on my face? Yes it did. I was oh so moved and pleased that she liked it!
So then you just cut and hand sew the roof in place (stretch it a bit) and let your cat enjoy a warm, cozy and cute place to sleep in!
Good luck!
Tell me if you see any other cat crafty things around please, or check out my tutorial page for more fun crafty/artsy ideas.

I’ve never seen a cat basket like this before, I love it, and yours turned out beautiful. Smilla is such a gorgeous kitty!
This is sooooo fun! My cats would love it! Yours came out beautifully!
this looks nicer than the ones i’ve seen in stores. Smila must love her new bed. she looks like a fine companion.
That’s brilliant Hanna and Smilla looks right at home! Thanks for the tutorial.
I just love that basket and may have a go at that, could not work out the instructions for the knitted one though. Well done, and if it gets cat approval, what more can one ask……..
How gorgeous! I love the way the fabric matches Smilla perfectly … :)
Thank you for sharing such a wonderful tutorial! I will make the bed for our new kitty. I love that it uses all materials I have on hand including the foam rubber. ( it came as packing material and really is like new) I look forward to your blog each day. You are such a creative woman!
great idea and I think I will try and do one! I picked up childrens books at the loppis 6 stk for 10kr! I am going to use them for my altered book, for my daughter.
That cat basket is brilliant!
I need a cat bed! I was thinking about making one but was unsure…Now I’m sure!
Thanks!!!
Purrrrrr-fect. Thanks for the tutorial. Come winter I think our kitties will need one to fight over.
Applause for such a gorgeous cat bed (and cat too!)
Thank you for sharing. You have made many cats & their owners very happy.
this is so adorable and i have tons of thrifted fabric…my hubby says they will probably ignore it, but i bet at least one cat will dig it.
That looks so great, Hanna! Tom says I can get a cat when we move into our new place (yay!), and I’m so going to make one of these when we do!
they’re both absolutly gorgeous. It almost looks like that cat just poured herself in to the basket like water on the first photo. beautifull job hanna.
I had to call my husband over to look at this post, your Smilla could have come from the same litter as our Sully! He actually asked me “When did you make that???” I had to show him that the picture wasn’t of our cat!
I have started 3 of these (one per cat!) from your excellent tutorial!
what a great cat basket!!! thanks for stopping by my blog and for the tip for the tutorial! i love it :)
btw…if you are interested in some fabric, i’d be more than happy to send you some for your upcoming projects :)
smilla looks so contented in her basket, and the basket is beautiful, my two wouldn’t sleep in a basket if their lives depended on it, it’s much more fun to sleep on the computer keyboard!!
I love this blog! I wish my sweet pet pilly will love to sleep in it…it seems so sweet…thanks ma!
Don Lapre Max
That’s a fabulous basket–it makes me wish I had a cat now.
lovely! Our kitty would probably like this in the winter….thanks for the tutorial.
We don’t have cats, but two little dachshunds that would LOVE this bed!
Cool instructions on how to construct a cat basket. This tutorial ideal for any sewer who owns a cat. Thanks for the post.
OMG!! This is so beautiful.
Love this, going to make one for my fur baby Martin and for my nans fur baby, she lives in Russia so I’ll bring it to her in December as we’re going there (“;
This bed is absolutely gorgeous. You’re a genius. Thankyou for sharing, this really inspired inspired me to make a bed for Martin. Much love, Paulina :3
This is a beautiful bed but the tutorial is incredibly vague, unless maybe someone is an expert in sewing I guess. I have literally no idea what happened in a lot of the steps.
Aww…. look at Smilla. She’s really adorable. An I love the cat basket and your blog